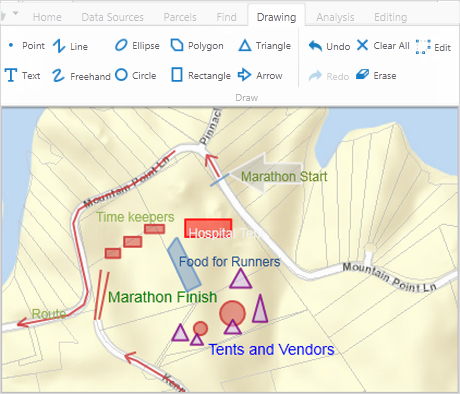
One advantage of web maps is that you can add bookmarks, measurements, shapes, and text to mark important features. When you add markup, it does not affect the original map. You can save a map with markup as a project and open it later or share it with others using a URL. You can also print the map or export it as an image and email it.

Different shapes and markup on the a map
To add markup to the map:
On the toobar, find the drawing tools.

An example of drawing tools grouped on a toolbar
Click Point, and then click any point on the map.
When you select the Point tool, you activate the Style, Size and Color tools. You can use these tools to change the style of your point to a circle, cross, diamond, square, or triangle shape. You can also change the size of your point and the color.

Tools to change the appearance of a point
Click Freehand, and then draw in any direction on the map.
When you select the Freehand tool, you activate tools that allow you to change the style of the line to dashes or dots, as well as the thickness and color of the line.

Tools to change the appearance of a freehand line
Click Line, and then drag across the map to draw a line.
To continue the line but change direction, click and then drag in the new direction. To end the line, double-click. You can change the style of the line using the same set of tools as the Freehand tool; Style, Thickness, and Color.
Click Polygon, and then drag across the map to start a polygon.
To change direction, click and then drag in a new direction. Shading appears to indicate that the polygon is filling in the space of the area made by your drawing. Double-click to end the polygon. You do not have to complete the shape, as long as the shading covers the area, you can double-click and the application completes the shape for you.
When you click the Polygon tool, you can change the border color, the fill color and the thickness of the border line.

Tools to change the appearance of a polygon
Click Rectangle, and then click one corner of the rectangle you want to draw. Drag away from the corner and a shaded rectangle forms under your cursor.
When you click the Rectangle tool, you activate tools that can change the border color, the fill color, and the thickness of the border line.
Click Arrow, and then drag across the map to.
An arrow forms under your cursor. To change the shape and size of the arrow, drag it up, down or sideways.
When you click the Arrow tool, you activate tools that can change the border color, the fill color, and the thickness of the border line.
Click Circle, and then drag away from that point to draw a circle.
The circle draws from the center out, so the further you drag your cursor, the bigger the circle gets.
When you click the Circle tool, you activate tools that can change the border color, the fill color, and the thickness of the border line.
Click Ellipse, and then drag across the map to draw an ellipse.
The ellipse draws from the corner of the shape, so you can change the shape by moving the cursor up and down or sideways.
When you click the Ellipse tool, you activate tools that can change the border color, the fill color, and the thickness of the border line.
Click Triangle, and drag across the map to draw a triangle.
The triangle draws from once corner of the triangle, so you can change the shape by moving the cursor up and down or sideways.
When you click the Triangle tool, you activate tools that can change the border color, the fill color, and the thickness of the border line.
Click Text, and then click on the map where you want the text to begin.
Type the text you want to add to the map.
When you click on the Text tool, you activate tools that can change the font family, the font size, color, transparency, and angle of the text. When you click the Text tool and then click a point on the map, the tool identifies features at that point. You can then use the Text tool to add this feature information to a label on the map.

Tools to change the appearance of text
See also...
Measure Distance and Area on the Map