ArcGIS Field Maps includes two apps: the Field Maps mobile app and the Field Maps web app. The Field Maps web app allows you to configure the maps mobile workers use in the Field Maps mobile app.
Caution:
If you configure the map using the Field Maps web app, you must use Map Viewer Beta when editing the map.
If you use Map Viewer in ArcGIS Online or Map Viewer in ArcGIS Enterprise to edit the map, the changes you make in the Field Maps web app will be lost.
- Available maps—Include only the maps mobile workers need in the field.
- Title, summary, and thumbnail—Edit the title, summary, and thumbnail of your map.
- Duplicate a map—Create a copy of an existing map.
- Feature templates—Reorder, duplicate, format, delete, and set default values for feature templates that are used for data collection.
- Form—Configure the form mobile workers use to collect data and perform inspections in the field.
- Offline—Prepare your map for offline use.
- Sharing—Configure the sharing settings for your map.
For an overview of the Field Maps web app interface, see Web app quick reference.
Hide available maps
The Field Maps mobile app provides access to maps that are shared with or owned by a mobile worker. You may have maps that you don't want accessed from the mobile app. For example, you may have maps that are made for ArcGIS Dashboards that are for desktop use only. To hide maps you own from the Field Maps mobile app, complete the following steps:
- In a browser, sign in to your organization and open the Field Maps
web app from the app launcher.
The Maps page appears.
Note:
The Field Maps web app only displays maps that you own.
- Select each map you want to hide in the mobile app by clicking the check box on the map card.
Tip:
Search for specific maps using the search bar.
- Click Hide in Field Maps mobile.
The selected maps are on the Hidden tab of the Maps page and are hidden from the Field Maps mobile app.
Note:
You can make hidden maps visible in the Field Maps mobile app at any time. To display maps that have been hidden, click the Hidden tab, select the map cards you want to display, and click Use in Field Maps mobile.
Configure title, summary, and thumbnail
Ensure that mobile workers can find the map they need in the Field Maps mobile app. To edit the map's title, summary, and thumbnail, complete the following steps:
- In a browser, sign in to your organization and open the Field Maps
web app from the app launcher.
The Maps page appears.
Note:
The Field Maps web app only displays maps that you own.
- Click a map card to start configuring the map.
The Overview page appears, displaying information about the map and the option to open the map in Map Viewer Beta.
- Click Edit to edit the map title and summary.
- Provide a title and summary, and click Save.
- To use a custom image for the thumbnail, hover over the current thumbnail and click Change thumbnail.
For best results, add an image that is 600 pixels wide by 400 pixels high or larger with an aspect ratio of 3:2 in a web file image format such as PNG or JPEG.
Duplicate a map
You can create a map based on an existing map in your organization. For example, you can reuse a map from a previous field season. You can create a copy of the map that contains the same layers and basemaps as the original. When duplicating a map, the summary, feature templates, forms, and offline settings are preserved.
Note:
Map areas, sharing settings, and the Hide in Field Maps mobile setting are not preserved when duplicating a map.
- In a browser, sign in to your organization and open the Field Maps
web app from the app launcher.
The Maps page appears.
Note:
The Field Maps web app only displays maps that you own.
- On the map card, click Duplicate.
- Provide a title for the new map and click Yes, duplicate.
The new map is added to the Maps page, and the Overview page appears.
Manage feature templates
Feature templates categorize assets and observations in a layer and are based on a specific combination of attributes. For example, feature templates for a damage assessment layer allow editors to categorize a new feature by the degree of damage to the building: Affected, Minor, Major, or Destroyed. The feature layer owner can preset the damage assessment attribute for these four options. This ensures that mobile workers enter a valid value for this attribute. In the Field Maps mobile app, the templates display as types of assets and observations mobile workers can collect.
The Field Maps web app allows you to manage feature templates in the following ways:
- Update the name and description
- Reorder feature templates
- Set default values
- Duplicate and delete feature templates
Note:
The Field Maps web app allows you to manage existing feature templates. Learn how to create feature templates in the following:
Start configuring feature templates
To start configuring feature templates, complete the following steps:
- In a browser, sign in to your organization and open the Field Maps
web app from the app launcher.
The Maps page appears.
Note:
The Field Maps web app only displays maps that you own.
- Click the map card to start configuring the map.
The Overview page appears, displaying information about the map.
- Click Content.
The Content page appears, listing the items in the web map.
- Click a layer under Editable layer or a table under Table to start configuring its feature templates.
The Templates tab opens, displaying the feature templates for the item.
Note:
As you configure the feature templates for a layer, you can use the Undo and Redo buttons to undo or redo changes you've made. Undo and redo actions are specific to each layer.
Update the name and description
Change the name and description of your feature templates to provide meaningful information to mobile workers. Mobile workers see this information when selecting a feature template in the Field Maps mobile app.
- Click a feature template.
The Formatting settings for the feature template appear in the Properties pane.
- Provide the name and description of the feature template by editing the Display name and Description settings.
- Click Save.
Reorder feature templates
The order of the feature templates on the Templates tab is how they appear in the Field Maps mobile app. You can reorder feature templates so mobile workers see the most commonly used templates at the top of the list.
- Drag and drop the feature templates to reorder them.
If the layer contains feature types, you can only reorder feature templates within their type. Feature types can also be reordered.
- Click Save.
Set default values
Set default values for feature templates so relevant information is available when mobile workers create a new feature.
- Click a feature template.
The Default values settings for the feature template appear in the Properties pane.
- Edit the default value for each relevant attribute.
To filter by attributes used in the form, click the Only show attributes in the form check box.
Note:
If a field has a range or coded value domain, the default value must honor it. If you set a default value outside the allowable range, an error message appears.
- Click Save.
Duplicate and delete feature templates
To duplicate a feature template, select it and click Duplicate. To delete a feature template, select it and click Delete.
Note:
You cannot delete all feature templates from a feature type. Each feature type must have at least one feature template.
Form configuration
Mobile workers read, enter, and update forms to collect data and perform inspections. To learn how to configure the form in the Field Maps web app, see Configure the form.
Configure the map to work offline
Ensure that mobile workers can take web maps offline if they'll be working in areas without a reliable internet connection. Use the Field Maps web app to configure the following offline settings:
- Enable offline mode
- Enable content for offline use
- Create and manage map areas
- Deliver features and attachments
- Use a tile package for the offline basemap
The Field Maps web app allows you to review and configure the offline status of your web map. To learn how to create web maps and mobile map packages (MMPKs) for offline use, see Prepare maps for download.
Enable offline mode
For mobile workers to take a web map offline, offline mode must be enabled. To enable offline mode, complete the following steps:
- In a browser, sign in to your organization and open the Field Maps
web app from the app launcher.
The Maps page appears.
Note:
The Field Maps web app only displays maps that you own.
- Click the map card.
The Overview page appears, displaying information about the map.
- Click Offline.
The Offline page appears, displaying information about the map's offline status.
- Turn on the Enable offline mode toggle button.You can enable or disable offline mode as needed.
Note:
If an item in the map is not enabled for offline use, an error message appears next to the toggle button and the item.
Enable content for offline use
The items in your map must be enabled for offline use to take your map offline. The offline status of each item in your map is listed in the Content section of the Offline page. If an item is not enabled for offline use, a warning and an error message appear. If an item is not enabled for sync, the Enable sync option appears. If a different error is preventing the item from being taken offline, click View item details to view the item page.
Click Refresh to update any changes you make to the map content outside the Field Maps web app.
For more information on the offline data requirements, see Enable the layers and map for offline use in ArcGIS Online.
Create and manage map areas
Creating map areas as part of the map allows you to prepackage one or more areas so that mobile workers can download them without having to configure the extent or level of detail. To create a map area using the Field Maps web app, complete the following steps:
- On the Offline page, click the Map areas section and click Manage areas.
The Manage areas window appears.
- Create map areas for mobile workers the same way you create map areas in ArcGIS Online.
For step-by-step instructions, see Create, edit, and manage map areas in ArcGIS Online..
Note:
Once map areas are created as part of your map, mobile workers cannot use the map without downloading a map area. If mobile workers are using the map for data collection, their captured assets, observations, and inspection information is only available on their device until the map is synced. Updates from other workers are not available without syncing.
Deliver features and attachments
By default, all features and attachments are downloaded and synced by mobile workers. However, they may not need all of this information to complete their work. You can limit the size and amount of data retrieved from the server during initial download as well as subsequent sync operations. This makes it faster for mobile workers to share changes and it minimizes data transfer costs. You can limit the types of data mobile workers retrieve from the server by adjusting the feature and attachment delivery settings in the Field Maps web app.
- On the Offline page, click the Features and attachment delivery section.A list of options appears for editable and read-only features.
- Select the delivery option for each type of feature.
Use a tile package for the offline basemap
If you want mobile workers to download operational layers instead of basemaps, they can use a basemap you created to copy directly to their devices. To specify a tile package to use for the offline basemap, complete the following steps:
- On the Offline page, click the Use a tile package for the offline basemap section.The Device will use the basemap defined by the web map option is selected by default.
- Select Device will use a tile package it already has and type the package file name in the text box.
- Click Save.
If the basemap is on their device, only operational layers are downloaded. If the referenced basemap isn't on the device, the mobile worker downloads the map's default basemap and the operational layers.
Configure sharing
The Field Maps web app allows you to configure the sharing settings of maps that you own. You can update the sharing settings for these maps in the following ways:
- On the My maps page, find the map you want to share and click Edit sharing on the map card.
- Click the map card in My maps. The current group sharing settings are shown on the Overview page. Click Sharing to update the map's sharing settings.
Note:
The Sharing dialog box displays the language set in the browser’s language setting. If the dialog box does not display in your language, adjust the setting for your browser.
For more information, see Share your map for use in Field Maps.
Web app quick reference
Use the Field Maps web app to configure the content and offline settings for your map. You can configure feature templates and forms using the following pages:
- Maps page—Find the maps you want to configure and determine which maps should be hidden from the mobile app.
- Content page—View the content in your map and configure feature templates and forms for data collection.
Maps page
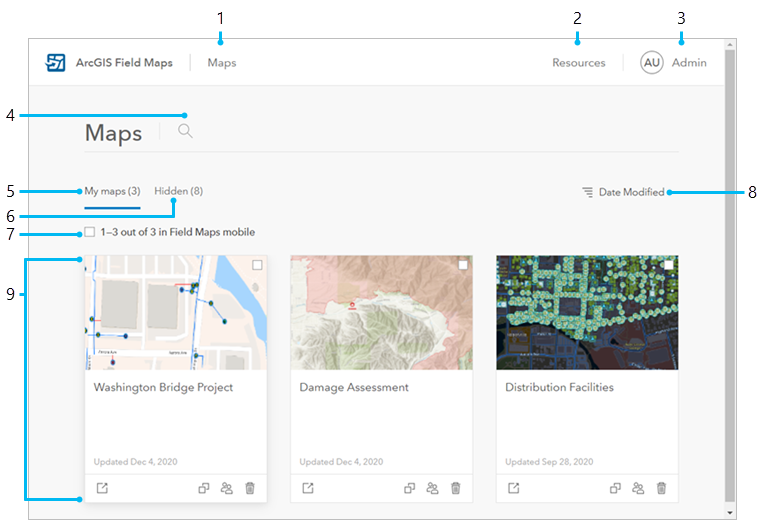
The Maps page shows maps you own. Find the maps you want to configure through browsing and searching, and determine which maps should be hidden from the Field Maps mobile app.

- Maps—Return to the Maps page.
- Resources—View tutorials, documentation, videos, and more.
- Profile—View your currently signed-in account and sign out.
- Search—Search for maps you own.
- My maps tab—Maps you own that appear in the Field Maps mobile app.
- Hidden tab—Maps that are hidden from the Field Maps mobile app.
- Select all maps—Check the box to select all of the maps in the My maps or Hidden tabs.
- Sort—Sort your maps by date modified or title.
- Map card—Configure
 , duplicate
  , share
  , or delete
  the map. Click the check box in the upper corner to hide or display the map in the Field Maps mobile app.
Content page
The Content page displays the items in your web map and allows you to configure feature templates and forms for editable layers.
Configure feature templates
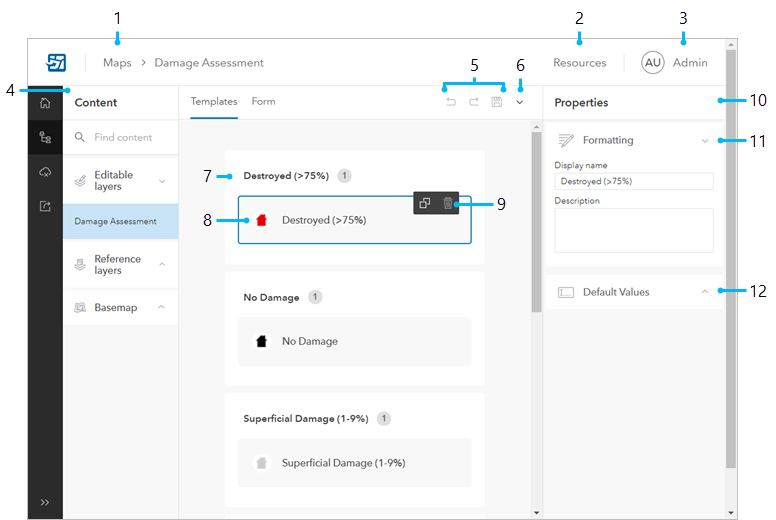
The Templates tab allows you to configure the feature templates mobile workers use for data collection. See Manage feature templates for more information.

- Maps—Return to the Maps page.
- Resources—View tutorials, documentation, videos, and more.
- Profile—View your currently signed-in account and sign out.
- Content pane—Find the editable layers, reference layers, tables, and basemaps included in your map.
- Undo, Redo, and Save—Undo, redo, and save your changes.
- Discard changes—Click the drop-down menu to discard your changes.
- Feature type—A type of feature within the layer. Feature types contain feature templates.
- Feature template—Mobile workers use feature templates to collect a specific type of feature in the Field Maps mobile app.
- Duplicate and Delete—Duplicate or delete the selected feature template.
- Properties pane—Displays the properties of the selected feature template.
- Formatting—Edit the display name and description of the selected feature template.
- Default Values—Edit the default values for feature templates.
Configure the form
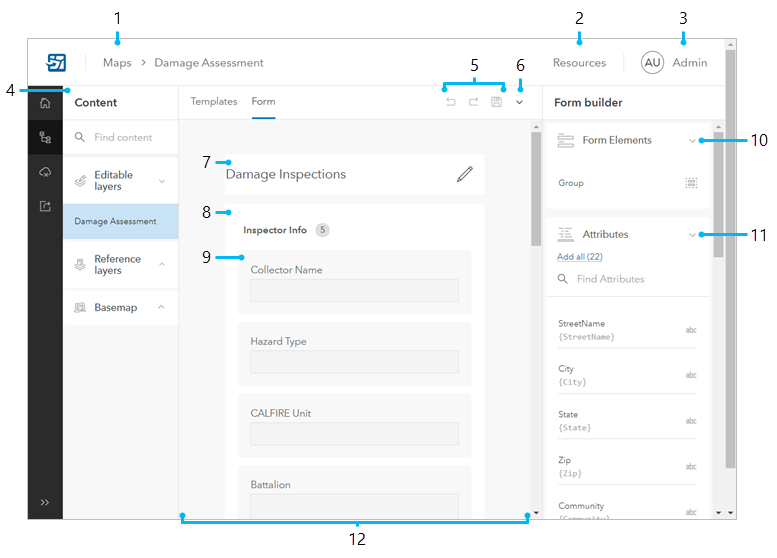
The Form builder allows you to configure the form mobile workers use for data collection. See Configure the form for more information.

- Maps—Return to the Maps page.
- Resources—View tutorials, documentation, videos, and more.
- Profile—View your currently signed-in account and sign out.
- Content pane—Find the editable layers, reference layers, tables, and basemaps included in your map.
- Undo, Redo, and Save—Undo, redo, and save changes made to the form.
- Discard changes—Click the drop-down menu to discard changes or clear the form.
- Form title—Edit the title of your form.
- Group—Group elements contain attributes. The number of attributes in the group is displayed next to the group title. Click a group to select it and edit its properties, add a conditional visibility statement, and collapse or expand the group. Click the selected group again to deselect it.
- Attribute—Attributes on the form canvas appear as entries on the form in the Field Maps mobile app. Click an attribute to select it and edit its properties or add a conditional visibility statement.
- Form Elements—Click or drag elements to add them to the form.
- Attributes list—Lists the attributes in the layer you can add to the form canvas.
- Form canvas—Drag form elements and attributes onto the form canvas to create the form.
Limitations
- In Mozilla Firefox, there's a known performance issue that causes a lag when dragging feature templates, form elements, and attributes on the Content page.